The purpose of the Payment File Uploads, is to allow the user to upload a bulk number of payment. Addition to calculating Dues Check-off for the District Council.
TABLE OF CONTENTS
- Finding where to submit the file
- How to post Dues Check-off manually (Using Manual Dues Check-off Button)
- Template Explanation
- Required Information to create a template without the Manual Dues Check-off Button
- Inputting Member Information
- Uploading the Template
- Matching Members from the Template to Member Records
Finding where to submit the file
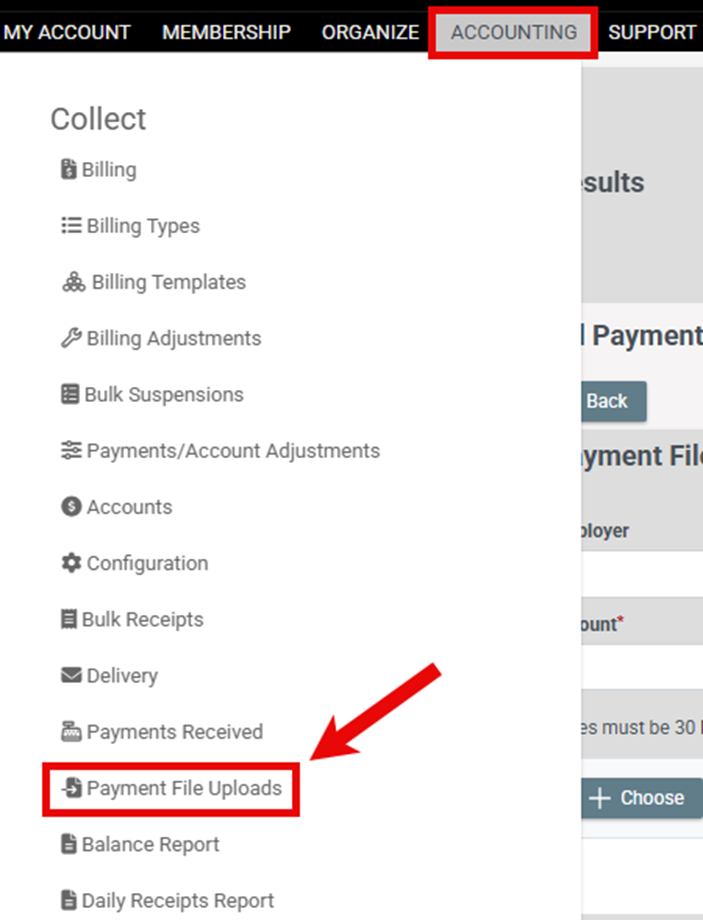
- Navigate to the Accounting Tab
- Click on Payment File Uploads
How to post Dues Check-off manually (Using Manual Dues Check-off Button)
- Click on Manual Dues Check-off in the upper right corner
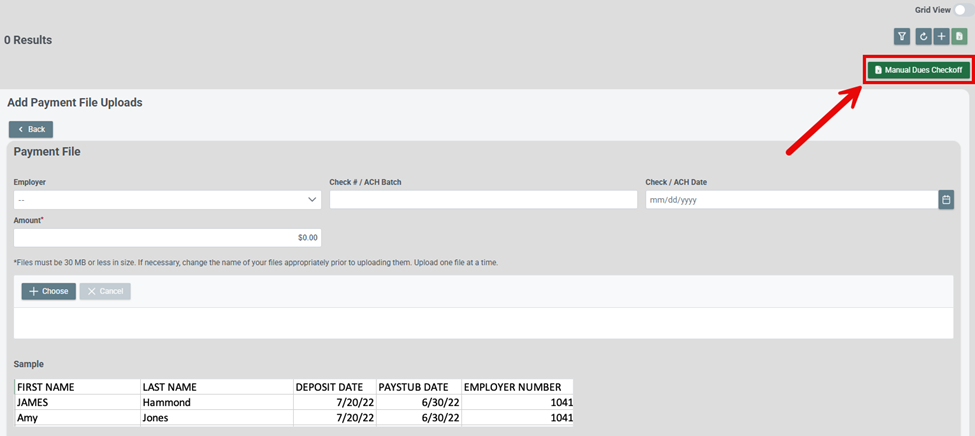
- Select your Organization (If not already there)
- Select the Employer, Contract, Payment Date, Deposit Date to define the template.
- If no deposit date is entered, it will default to the day it is generated,

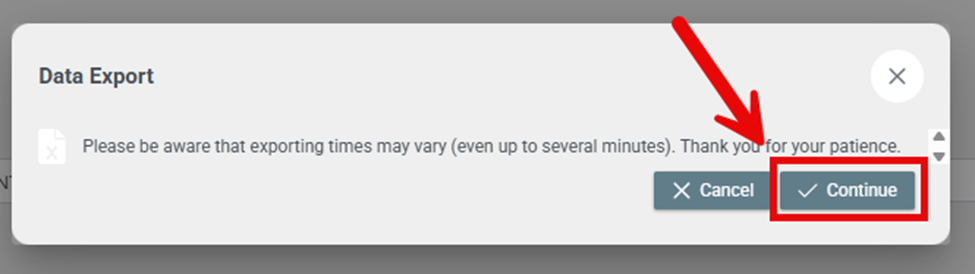
- Once all the information is inputted, press the Template Button, then press Continue

Template Explanation
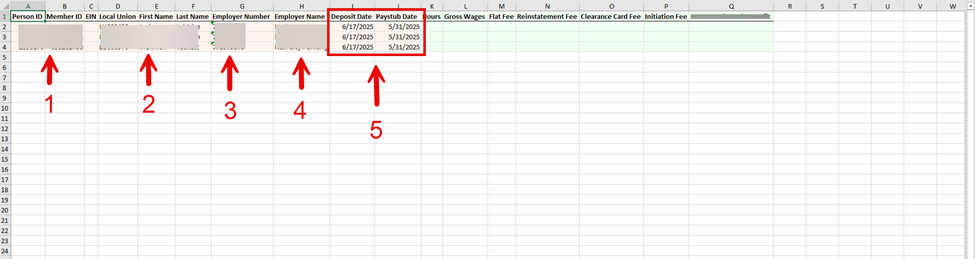
- Important information on the template
- Member's Identification (Person ID, Member ID, EIN)
- Member's Information (Local Union, First Name, Last Name)
- Employer Number
- Employer Name
- Deposit Date and Paystub Date
Required Information to create a template without the Manual Dues Check-off Button
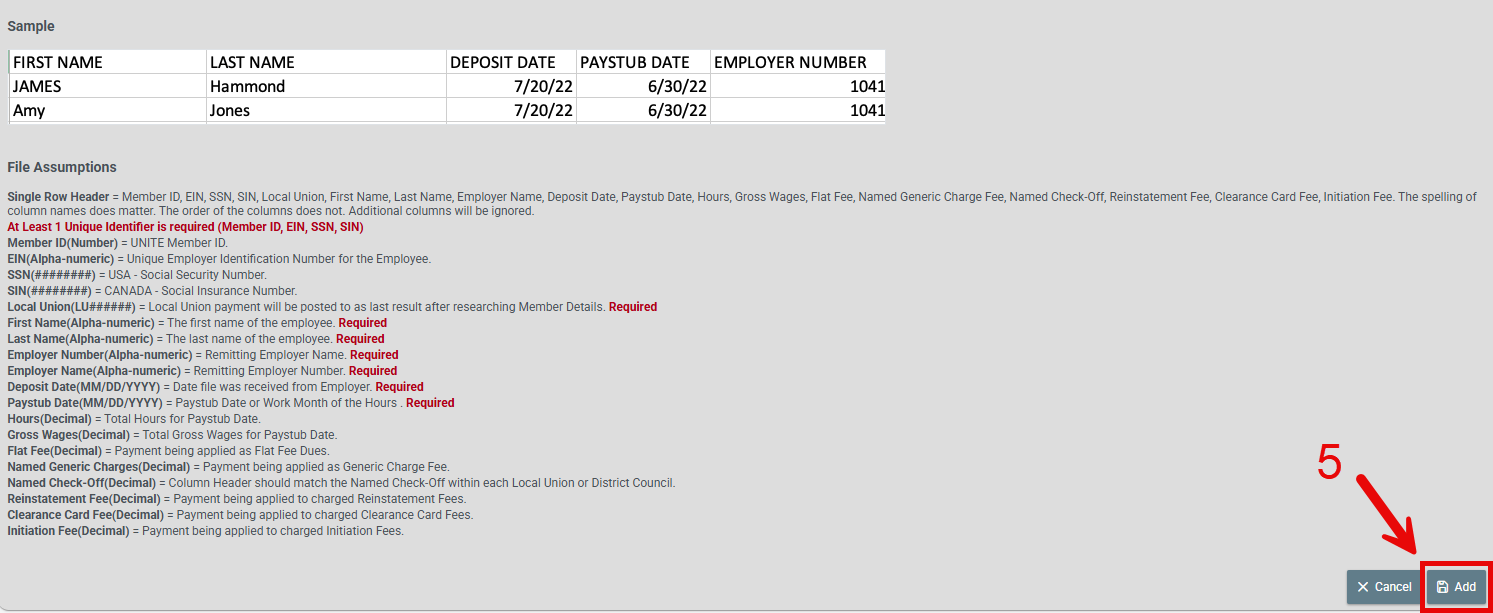
- Everything labeled as required is needed for the template to be accepted by UNITE
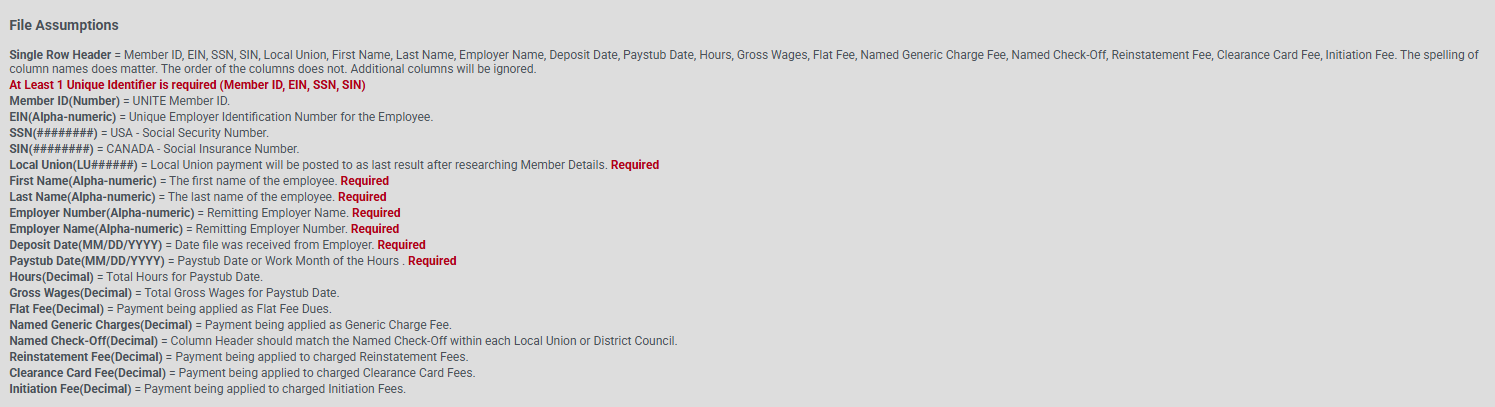
Inputting Member Information
Each column has its own unique type of payment/amount dedicated just to it.
- Hours
- Gross Wages
- Flat Fee
- Reinstatement Fee
- Clearance Card Fee
- Initiation Fee
- Etc.
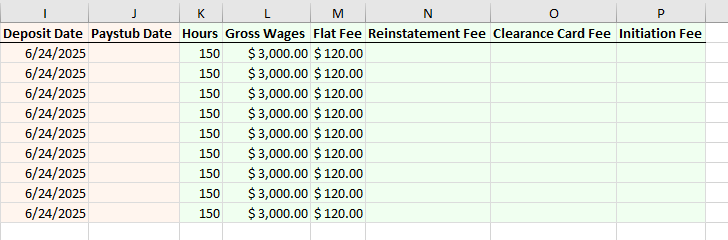
- For this example, we are submitting the hours, gross wages and dues check-off for these members.
- Delete any rows of members who have no information to upload.
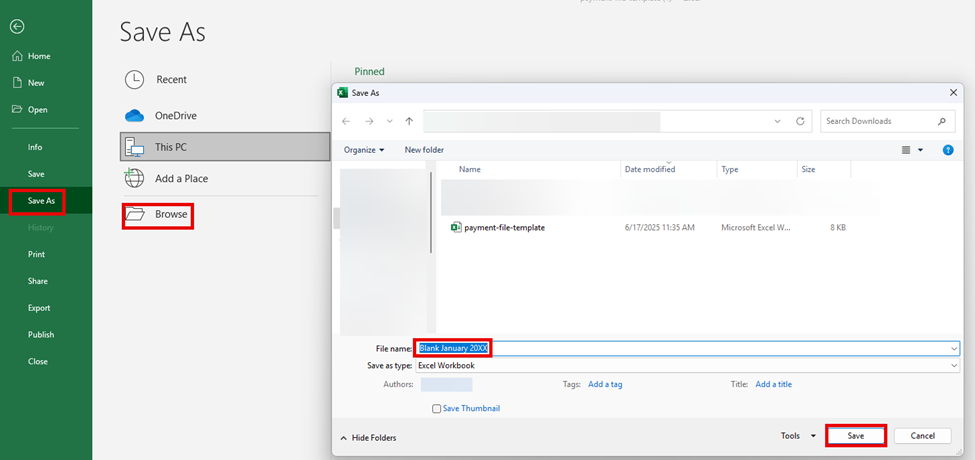
- Save the Template (Recommend you save the Employer Month Year (Blank January 20XX))
- To save the Template press Save As > Browse > (Enter New Name) > Save
Uploading the Template
- To begin uploading the Template begin with clicking the + button in the top right
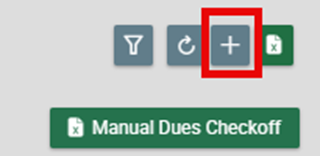
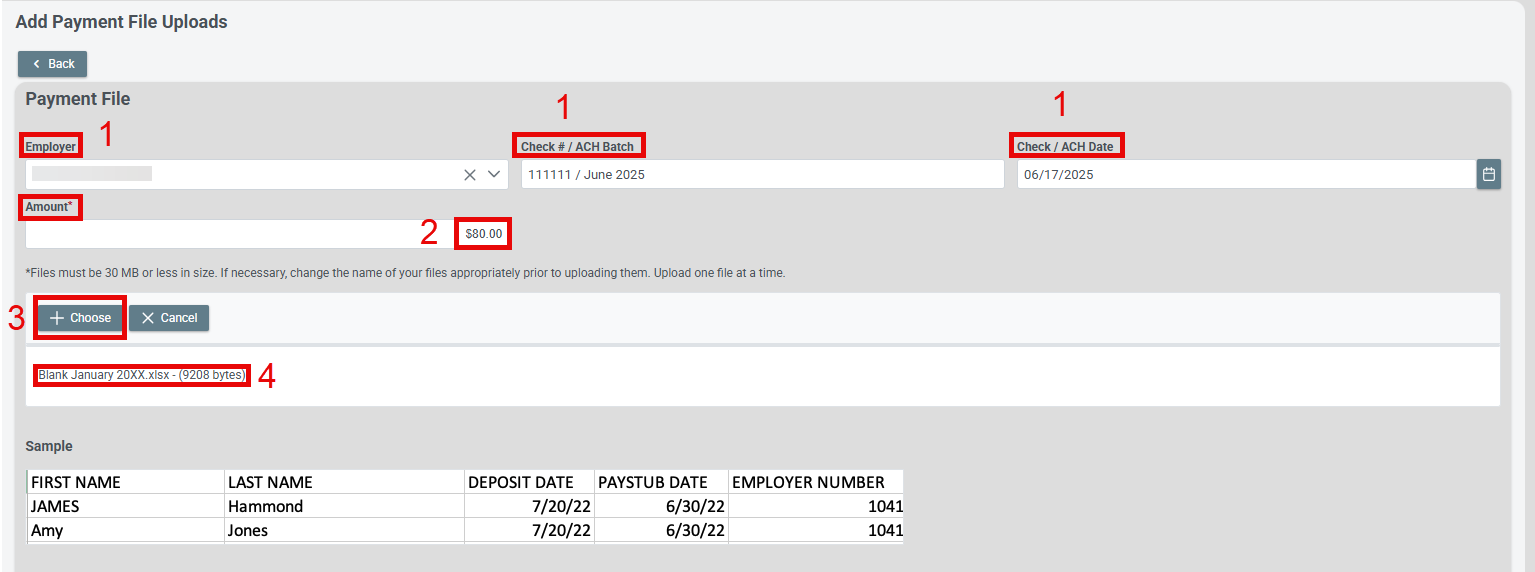
- To upload the Template
- Enter any tracking information you wish
- Employer
- Check # / ACH Batch
- Check / ACH Date
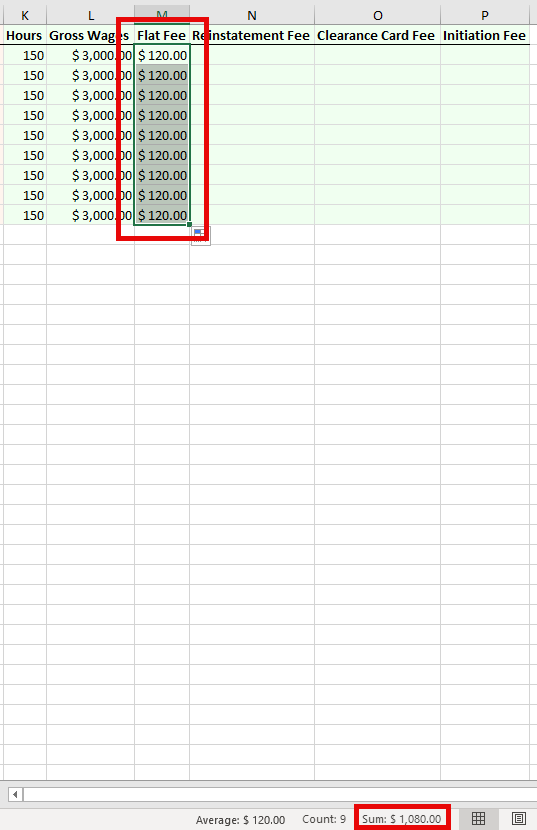
- The amount is the only required piece of information. (Trick to make it easier, Drag and select all the cells in excel that have amounts. The total will be in the bottom right. Photo demonstrating it at the end of the steps)
- Press the Choose button to choose which file to upload
- verify the file uploaded
- Press Add to submit the Template
- Enter any tracking information you wish
- Once the Template was been uploaded, a new entire will appear with a orange corner.

- IF IT DOES NOT APPEAR, check your email for a message on what was incorrect.
- After fixing what listed in the email message, revert back to Step-By-Step Guide on uploading the Template
Matching Members from the Template to Member Records
- If the Employer Card appears, click on it.
- You should receive an email stating the template was uploaded.
- UNITE will direct match all the people with correct information.
- If it is not a direct match, it will state Unmatched or Needs Review.
- Unmatched - Indicated with a red cycle
- There is no member in UNITE to match the one on the Template
- Needs Review - Indicated with a yellow cycle.
- There are inconsistencies with the member information on the Template
- Unmatched - Indicated with a red cycle
- The member(s) who do not have a match (Unmatched) will need to be manually matched to a member record or inputted as an Non-Member.
- To manually match a member, click the Match button

- Once you are trying to match, UNITE will give the option to filter and sort to help narrow the search down.
- To match someone, click the circle beside the last name, then press Match in the top left.
- To add an Non-Member, press Add Non-Member and follow the directions in the link below
- To manually match a member, click the Match button
- If it is not a direct match, it will state Unmatched or Needs Review.
- Once all the members have been matched, press the Process File button.
- This will begin posting the amounts to the members listed.
- This step may take some time, it is dependent on the volume of members on the template.
- Once the Template was been processed, you will receive a confirmational email.
Was this article helpful?
That’s Great!
Thank you for your feedback
Sorry! We couldn't be helpful
Thank you for your feedback
Feedback sent
We appreciate your effort and will try to fix the article